

NEEDLE FELTING STARTER GUIDE PART 1
BASIC UNDERSTAND OF NEEDLE FELTING

Needle felting is a fabulous hobby for everyone from age 8 to 80+. It is easy to learn and fun. The technique is easy (and repetitive). The more you practise, the better you will get.
* No sewing, knitting, or crocheting skill require. The range of items and projects you can create are unbelievable big.
* No time limit, no pattern needs to follow. You can start a project today and stop for some time if you are busy then pick it up again whenever you are available again.
* Simple to start with - The costs of starting it are simple and affordable. You only need 3 things to start with: a few tiny felting needles, a small workstation (for example: a foam pad) and some un-spin fibre (coloured wool roving & core wool).
What is Needle Felting?
1. Felting needles: -
Felting needles are different from normal sewing needles. It is a long, 7 shape thin needle (with NO EYE). At approximately 2cm towards the point of the needle it has some special made notches (barbs) around the sides of the needle. Felting needle is sharp and relatively brittle. However, if you handle it with care and using it correctly, the needle will not break easily. Needles should go in and out at the same angle (straight in and straight out or sideway in, then same angle sideway out), avoid hitting solid object/surface, do not use the needle to move fibre sideways or felting with intense force.
2. How felting needle works
You use this specially designed felting needle to poke into the loose fibre, the needle brings the fibre together but will not bring it back when the needle is pulled out. As you continue the poking action you will notice you wool becoming more compact. Just keep poking then the wool will then compress into felt and you have the shape you want.
3. Is it hard to learn?
No, it is easy to lean. As long as you can manage a few basic skills then you can start making your own creature and exploring the unlimited potential of making almost anything that you can imagine. You can make 2D wool painting or 3D sculpture items: animals, cartoon characters, jewellery, or home decoration and more…
There are many needle felting tutorials and YouTube videos that have been done by great fibre artists and people who love needle felting. I have learnt my needle felting knowledge and skills from them. I would like to share them here with you and wish they will help you on your needle felting adventure.
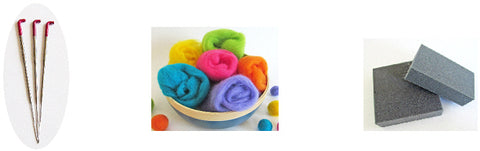
You only need 3 things to get start – They are all included in our starter pack.

- Wool Roving & Core wool – Wool roving is un-spin fibre (coloured wool roving & core wool), they are widely use in needle felting. Core wool that is carded but not combed. It is coarser than wool roving but very good for the core of your projects.
- Foam pad – the working station with which to support your project and protect your work surface and your needles. The high density foam is better than upholstery or cleaning foam.
- Felting needles - They come in many sizes from 32 gauge to 42 gauge (the most common sizes). The bigger the number the finer the needles are (42 gauge is finer than 36 gauge)

These are all you really need to get started. After you learn how to do needle felting you may add other common craft items for more exciting projects: scissors, a small awl, craft glue, craft eyes, pipe cleaners, beads etc.…

Here are a few useful tips may be helpful for new needle felters
No.1 tips :
1. To avoid breaking your needles –Whatever angle you poke your needle into your project, keep it at that angle until you pull it out

2. Be aware the density or firmness of your project can cause needle breakage. If the needle will not enter a surface with ease do not force it. Change to a finer/ higher gauge needle than the one you are using (eg. Change the 36 gauge to 38 or40 gauge).
3. Keep rotating the object (no the needle) you are felting to make the shape you want.
4. The felting needles are thin and sharp, make sure you keep them out of reach from young children and pets.
5. Needle felting requires your undivided attention. This is not a good idea to watch TV when felting.
How the felting needle should be positioned when felting
You do not need to poke too deep as all the notches are located with 2cm from the tip. You don’t want the barbs to work with your foam pad rather than the wool roving.

How to divide the wool
When the wool is twisted it will be difficult to separate so remove the twist first (gently turn the wool roving around)

Normally I do not use scissors to cut the wool to length unless for some particular project like adding long hair for animals which require big amount of similar length of wool.
* Divide in length —You can not separate the fibre if your hands are too close. Use your hands to hold the wool approximately 10-15cm apart. Then give it a gentle pull and the wool will separate easily.

* Divide the wool in width - simply pull it sideways.

Please click here to learn how to make different shapes and a bumble bee